BCHO Cloud services offers access to Google Apps for State Officers, and other State level positions to automate a number of responsibilities. BCHO has received free access Google for nonprofits to help streamline some of the BCHO Volunteer State & Chapter management duties. We are now using Google Drive for distribution and sharing of OET documents, Google Calendar for chapter events and Google Sheets to enter Volunteer Hours and generate reports for Agencies.
You will also need to have basic computer skills, and know how to start, use, and change settings of the Web Browser. A web browser is a program on your computer or device that allows you to access the internet. Popular web browsers include Google Chrome, Mozilla Firefox, Microsoft Edge, and Safari. To use BCHO Cloud services it is recommended you use Google Chrome.
A PC, Chromebook or MAC is needed to launch the Google Web Apps BCHO has chosen to automate some responsibilities. You will need to open the Chrome Web Browser at www.google.com and login to the assigned BCHO online account or to your personal Google account. From here you will launch web apps to perform duties associated with your volunteer position. If you already have a personal Gmail account you will need to have an understanding how to switch between accounts.
Online Google Account Requirements
To use these services an online Google account will be assigned to State Officers, and other State level positions. For other members that need access to the BCHO online services will require a personal Google account, for some you may want to use both. BCHO assigns online resources using your primary email address provided with your membership application. If your primary email address is already a Gmail address, you’re good to go! Please skip to section “Logging in to BCHO Cloud Services.” For others please continue reading for further instructions.
If your primary email services is provided by another company, and your email address ends with @aol.com, @msn.com, @outlook.com, @me.com, @icloud.com, or any non-Gmail address you will need to establish your primary email address as a valid username to login to a personal Google account. This will not affect or change how your email now works, but will allow you to access our BCHO online resources.
Method 1
I don’t currently have a Google account. I’d like to create one using my primary email address to access BCHO’s online resources.
Create a Google account using your existing email address.
- Go to the Google Account Sign In page at (https://accounts.google.com/signin).
- Click Create account.
- Enter your name.
- Click Use my current email address instead.
- Enter your current email address.
- Click Next.
- Verify your email address with the code sent to your existing email.
- Click Verify on the email you received.
Method 2
I have a Google account with a Gmail address, but it’s different from the main email address I used to register with BCHO. I’d like to add my primary personal email address to my Google account as an additional username.
Add an alternate email address to my Google account.
- Open your Google Account (https://myaccount.google.com/). You might need to sign in.
- Select Personal info.
- Under “Contact info,” click Email.
- Next to “Alternate emails,” select Add alternate email or Add other email. You may need to sign in again.
Note: It must be added under “Alternate emails” so it can be used to sign in to your account. If it’s listed under the “Recovery setting” it must first be removed to add it under Alternate. - Enter an email address you own. Select Add.
- Verify your email address with the code sent to your existing email.
- Click Verify on the email you received.
If you fail to create or configure your email as a Google Account, then you will not be able to access BCHO’s Cloud Services. It is required you correctly complete one of the two methods for access, the online calendar, the BCHO Drive, the BCHA Drive and the Volunteer Hours Spreadsheets.
Logging in to BCHO Cloud Services
To login you need to open www.google.com in a web page. To make it the easiest to use OET Cloud Services, open Google App, it is best to set your Chrome web browsers home page to Google by setting the it to “open a new tab”, or just go to main Google search page, www.google.com. This page displays the “Google Bar” where you can click to login or see if you are currently logged in to some online Google account.
If your home page is set somewhere else, then you will need to type www.google.com each time you open a new web browser tab or select it from a Bookmark you have created. See how to open new Tabs.
Google Bar Examples

Not Signed in to any Google Account. Click on Sign in to open a login window to enter your username and password.

Signed into BCHO Cloud Account where the chapter logo was set to the account icon. Clicking on the icon provides a choice to switch or login to another account.

Clicking on the icon to the left 3×3 square of dots opens the Google Launcher so you can start an app.
Google Login & Search Page – www.google.com
The Google Bar is shown in the upper right corner of the Google Login & Search page. It can change to reflect which online account is currently active for the open Window that is shown.

The Google Bar provides icons to click on to display your account information, open the Google Launcher menu and other account related goodies.
It is very important you master always knowing which account you are using. Being unsure will cause unpredictable results using the BCHO Cloud Services.
Opening BCHO Cloud Applications
The Google Launcher Window opens by clicking on the 3×3 icon square, and provides an easy way to open the Google Web Apps associated with your account, in this case the BCHO Cloud Account.

The Google Launcher is used to open apps we use under BCHO Cloud Services.
BCHO Cloud Services will provide access to group email, BCHO Drive, contacts, and online calendars. One simple click on an icon in the Launcher opens any of the BCHO Cloud services Applications.
Explore the Apps: The Launcher menu will display all your Google apps. You should see icons for:
Google Drive: A blue, green & yellow triangle representing cloud storage, allows you to access the BCHO Drive Shared folder. It also provides the ability to create documents with Google Docs, Google Sheets, and Google Slides and to share them with other BCHO State Officers and Staff. Google Drive lets you create basic Word and Excel files. Once logged in click on the red Create button to pick the type of document to create or view.
Google Docs: A blue document icon for creating and editing text documents.
Google Sheets: A green grid symbolizing spreadsheets. These are used to report Volunteer Hours.
Google Calendar: A blue, green, yellow and red square with a date, used to have your chapter events listed in the Highline Newsletter and on the website.
Google Meet: A blue, yellow, green & red Camera used for on-line video meetings or conference calls.
The Google Login & Search page, see image above, provide a streamlined and cohesive sign-in experience for all users.
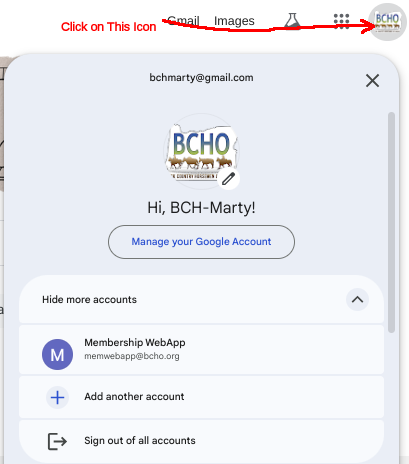
Click the round icon in the Google Bar to open the account chooser. From here you can see which account is active, see other accounts logged in, add another account or sign out of all accounts.
An account chooser, see Google Bar Examples above, that makes it easy to switch between your other personal Google accounts, and includes more security enhancements.
Simple click on one of the other accounts listed to make that account active for the current window/tab showing.
The current active account is listed at the very top, while other logged in accounts are in the list below. Clicking on another account moves it to the top area of the window.
Customizing the Launcher
The Google Launcher allows some degree of personalization. Here’s how to adjust it for your convenience:
- Pin Frequently Used Apps: Click and hold on the icon of an app you use often. Drag it to the top row of the Launcher menu. This pins the app for easier access.
- Unpin Unused Apps: Hold down an app icon you rarely use and drag it out of the Launcher menu. This removes it from your view, decluttering your app list.
Remember: Pinning and unpinning only affects the Launcher’s view. All your Google apps remain accessible, even if not pinned.
Editing or Adding Events to the BCHO Online Calendar
Introduction
BCHO utilizes the Google Calendar app, as part of BCHO’s Cloud Services, to ensure events are seamlessly integrated into the Highline newsletter and instantly shown on the BCHO website. This will guide you through accessing and adding events to BCHO Google Calendars on any of your devices.
Getting Access to BCHO’s Calendars
To manage chapter events, chapter leaders will use the Google Calendar app. This requires a Google account linked to the email address from your BCHO membership’s application. If you haven’t set up this email address as a Google account, follow the steps in the April 2024 Highline, page 5. Once your Google account is active, you will use it to log in and open the Google Calendar app. As an option you can also use the assigned Chapter BCHO Cloud account too, or if already using Gmail your all set. If you need access to your Chapters Calendar contact web@bcho.org.
Open The Calendar App
Smartphones, tablets:
- Get the Google Calendar App: This app is available to download from the Google Play or Apple App Store. Search for “Google Calendar” in your device’s app store and download it. Generic Android smartphones include this app by default.
- Add Your Email Registered with BCHO: Under the Settings App on your device add your BCHO-assigned email as a Google Account. This account will then be used to access any BCHO Cloud Apps.
- Add the Google Calendar App to your device’s home screen, touch to open.
PC’s, Chromebooks or Mac’s:
- Open Your Web Browser Application Window:
From the window go to web address https://www.google.com. Chrome is the recommended web browser, but most others will work. - Sign in with Your OET Email:
Use the Google account set up with your OET-assigned email to sign in to your Google Account. - Start the Google Calendar App on PCs or Mac-book: Locate and launch the Google Calendar App on your device. Refer to the June & July newsletter on logging in and using the Google Launcher to start the calendar app.
iPhone and Mac Users: See below for information on how to configure your Apple device to use the Apple Calendar App instead of the Google Calendar App.
Adding Events to the BCHO Calendars
- For Tablet and Smartphone users simply Tap the “+” Button: Look for a prominent “+” button at the bottom right corner of the app screen. Tapping this button will initiate the event creation process. On your PC, Chromebook or Mac-book just double click: on day you want to add the event. Ensure you are seeing the Month view, its the easiest view.
- Fill in the Event Details:
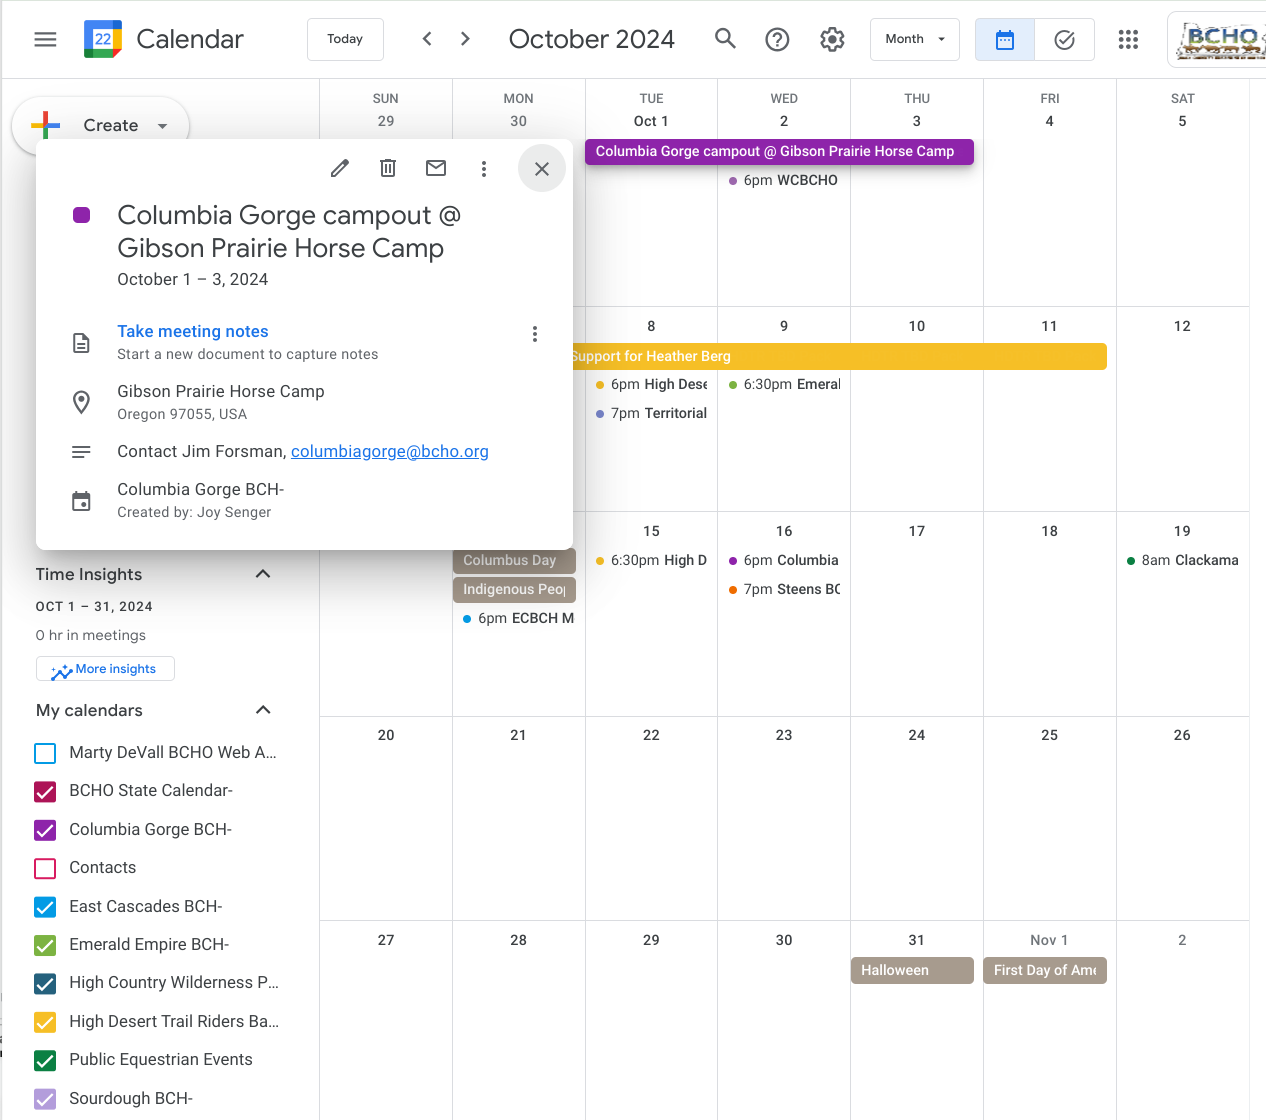
- Title: Enter the chapter abbreviation with a clear and concise title for your event (e.g., “TRBCH Trail Ride” or “CGBCH Campout”).
- Description: First add the contact name and number or email, followed by the description of the event.
- Date and Time: – If the event is not multiple days in a row, uncheck “All Day Event” and enter the start and end times.
- Location of event: – Make sure the Google Map location is included. This will allow smartphone users to pick the location from the calendar event and get driving directions directly on their smartphone.
- Assign the Calendar: Select the appropriate BCHO calendar for your event.
 Note: You will only see the calendars you have permissions to edit or have Subscribed.
Choose the calendar for your specific chapter. Only use one of these names:- BCHO State Calendar-
- Columbia Gorge BCH-
- East Cascades BCH-
- Emerald Empire BCH-
- High Country Wilderness Packers BCH
- High Desert Trail Riders Back Country Horsemen
- Sourdough BCH-
- Steens BCH-
- Territorial Riders BCH-
- West Cascade BCH-
- Public Equestrian Events Calendar
- Save the Event: Once you’ve filled in all the fields, tap the “Save” button. This will finalize your event creation and add it to the chosen BCHO calendar.
Additional Tips
Verify your events: The BCHO website displays your events instantly. Open the Calendar web page to see your events are listed.
Getting Help: If you encounter any difficulties using the app or have questions about seeing your calendar listed, don’t hesitate to contact, web@bcho.org. Also refer membership resources web page for the full help document Adding & Editing events on the Online Calendar for your Chapter Help
Use your iPhone’s or MAC’s Calendar App
For iPhone and MAC users this will show you how to access your BCHO Calendars (Google Calendars) using the standard iPhone and MAC Calendar app.

We’ll proceed under the assumption that you’ve already created a Google Account using your BCHO registered email address like name@icloud.com or name@msn.com. If your registered email address is already a Gmail address (name@gmail.com), that works too! See the section above, Online Google Account Requirements.
Add the Google Account to Your iPhone
This will give you the ability to view (or even edit), BCHO Calendar events directly on your iPhone with the most ease of use. To add a Google account to an iPhone, do the following:
- Open Settings
- Tap Mail
- Tap Add Account
- If you’ve already linked other accounts, tap Accounts
- Tap Add Account
- Tap Google
- Enter your email address registered with OET set up as a Google Account (see the May Issue article)
- Tap Next
- Enter your password
- Tap Next
- Enable the Google Calendar sync setting. This enables full use Google Calendars inside the iPhone Calendar. You can choose to sync other Google apps with your iPhone; Mail, Contacts, Calendars, and Notes. You can update these settings at any time. Only choose to sync Mail, if you’re adding a name@gmail.com account.
If your an iPhone user with a Gmail email address, you most likely have already done this, just enable Calendar Sync!
Hide/Show Calendars on your iPhone
Your iPhone Calendar can display all calendars linked to your Google account. This includes any subscribed OET Calendars it has access to. To show or hide specific calendars:
- Open the Calendar app on your iPhone.
- Tap “Calendars” at the bottom left.
- Check or uncheck the boxes next to the calendars you want to see or hide.
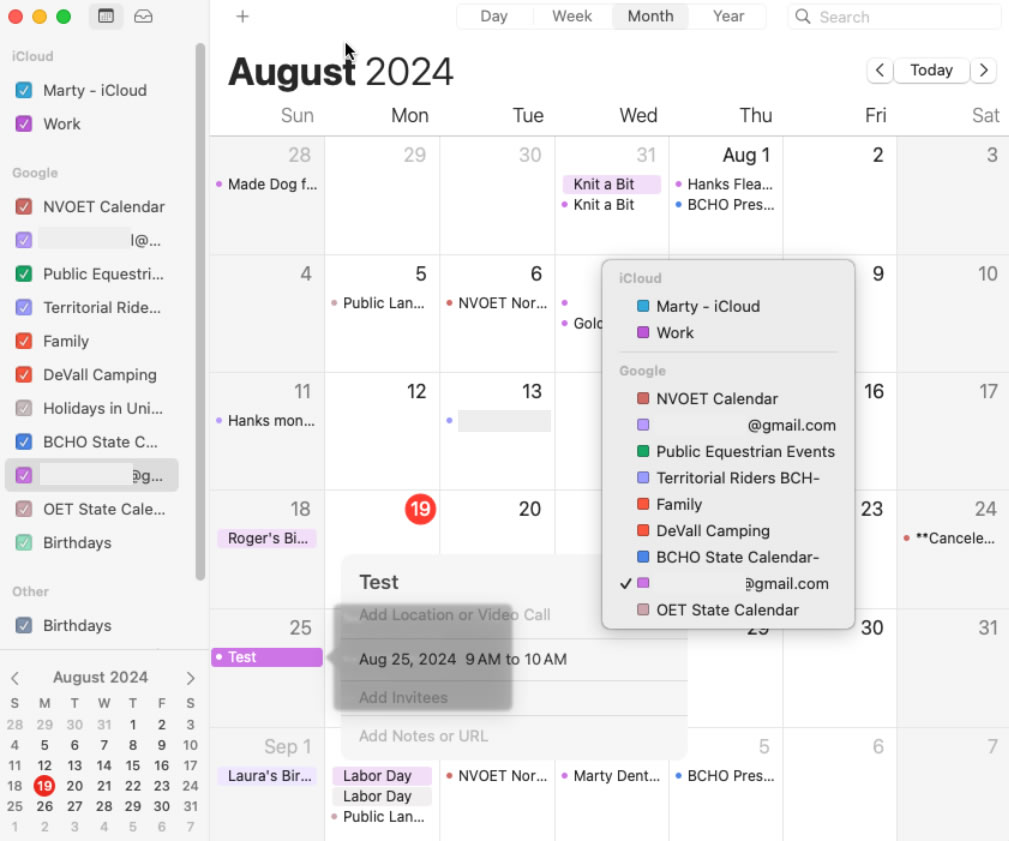
Below in this example of the iCalendar App on a Mac Pro, very similar on the iPhone or iPad.
- Left Side of image – Shows the list of calendars. Top shows two iCloud Account Calendars, next down shows the Google Account Calendars. Here is where you choose which calendars are visible on your iPhone Calendar’s main view.
- Middle of image – The event named “Test” is open for editing, the cal-list icon clicked, showing a list of calendars to assign the open event to. This list shows calendars you can add/edit events on.
Additional Notes
You can Subscribe to BCHO (Google) Calendars from the iCalendar App, but this method doesn’t allow for adding or editing of events. This only offers the ability to show the events of the calendars you choose. To edit Calendar events would require the installation and use of the Google Calendar app directly on your Apple device, or just use our recommendation.
The iPhone, MAC or iPad all provide a common built in Calendar App. Linking this to your Google Account with the same username associated with your registered BCHO email address provides the easiest way to manage your BCHO schedules within the Apple ecosystem. You’ll enjoy the same full access to your BCHO calendars as you would with the Google Calendar app itself.